 Save
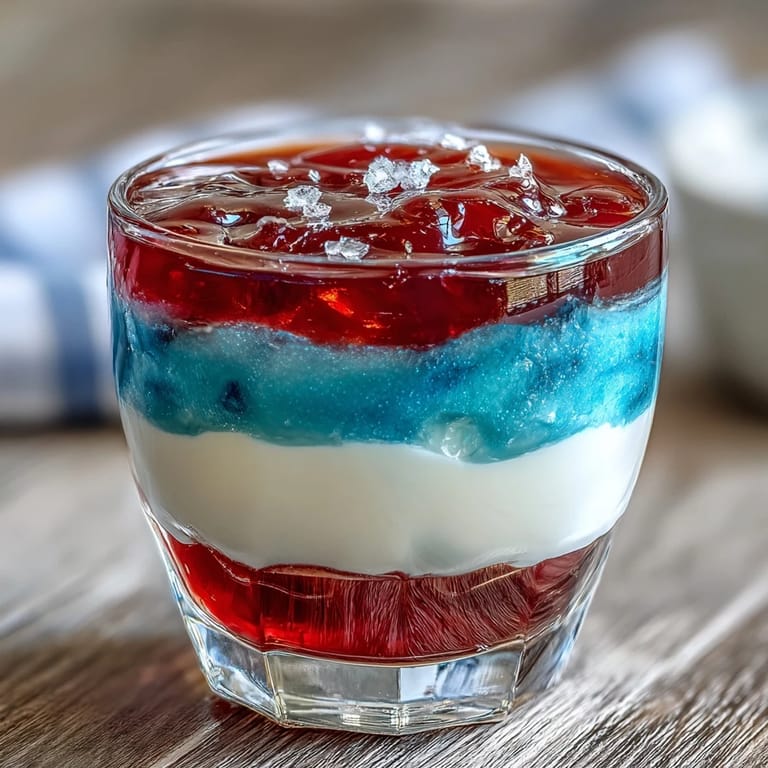
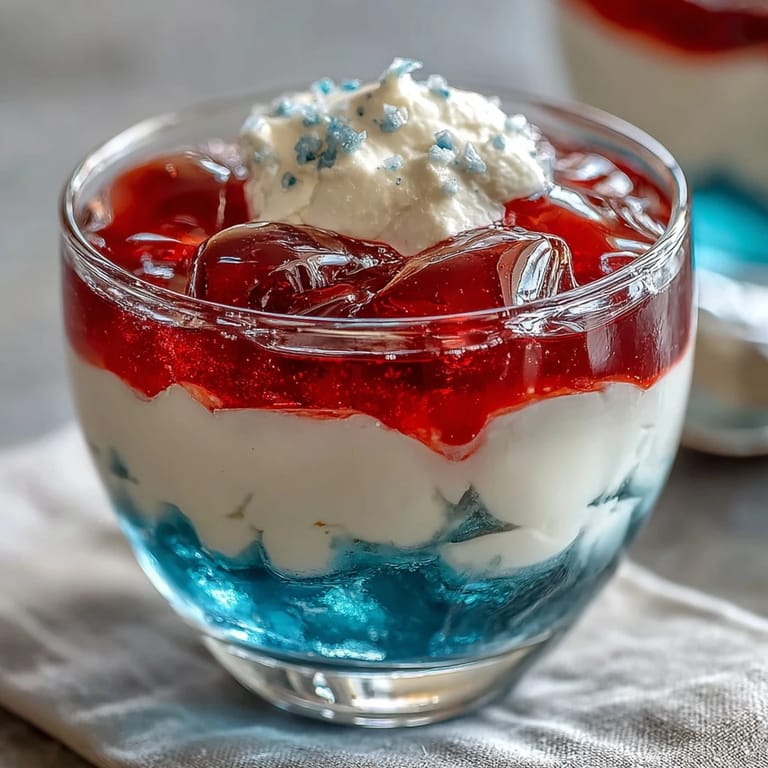
Save My daughter came home from school one July afternoon clutching a hand-drawn invitation to a backyard potluck, and I knew exactly what would make her smile—these patriotic layered jellies that look like edible fireworks. There's something magical about watching a clear cup transform into stripes of red, white, and blue, each layer a small victory of patience. She helped me tilt the cups at odd angles in a muffin tin, giggling at the contraption, and suddenly dessert became an adventure. These aren't just wiggly treats; they're a conversation starter, the kind of thing that makes people pause mid-bite and marvel at the effort.
I made these for a Fourth of July gathering where half the guests were kids bouncing off sugar already, and somehow these jellies became the calm-down dessert everyone gravitatingly toward. One little boy asked his mom if the layers would fall apart when he ate them, so I explained how waiting for each layer to set meant they'd stay perfectly stacked all the way to the last spoonful. That's when it clicked for me—these cups aren't just pretty; they teach a lesson about the payoff of patience, wrapped up in something delicious.
Ingredients
- Strawberry or cherry flavored Jello (3 oz box): The red layer needs to be bold and flavorful; don't skimp on the quality here because this is your first impression.
- Boiling water: Always freshly boiled so it fully dissolves the gelatin without lumps.
- Cold water: Essential for stopping the cooking process and bringing the mixture to a temperature that won't melt what comes below.
- Unflavored gelatin (1 envelope): This is the secret to the creamy white layer—it gives structure without competing flavors, and blooming it first prevents clumping.
- Sweetened condensed milk: The star player of the white layer, creating that luxurious creaminess that contrasts beautifully with tart fruit layers.
- Blue raspberry flavored Jello (3 oz box): The finale that needs to be vibrant and eye-catching; let it cool fully or you'll melt the white layer beneath.
- Whipped cream and fresh berries (optional garnish): These finish the look and add freshness that cuts through the sweetness.
Tired of Takeout? 🥡
Get 10 meals you can make faster than delivery arrives. Seriously.
One email. No spam. Unsubscribe anytime.
Instructions
- Set up your cups and get ready:
- Line up eight clear cups—this is when a muffin tin becomes your secret weapon because the angled slots will hold the cups tilted at just the right angle for the first layer to set without sliding. Have everything within arm's reach because once you start dissolving gelatin, momentum matters.
- Make the red layer and angle it:
- Dissolve the strawberry Jello in boiling water, watching it dissolve completely into that translucent ruby color, then add cold water to bring the temperature down safely. Divide it evenly among the cups—about two tablespoons per cup—and nestle them into the muffin tin at an angle, then slide the whole setup into the refrigerator for 45 to 60 minutes until the surface feels set when you barely touch it.
- Build the white layer with care:
- Sprinkle the unflavored gelatin over cold water in a clean bowl and let it sit for five minutes to bloom, watching it absorb the water like a tiny sponge. Pour boiling water over it and stir until completely dissolved, then add the sweetened condensed milk and watch it transform into a creamy vanilla cloud, cooling it to room temperature before it touches the red layer or everything will blur together.
- Layer the white on top:
- Once the red is fully set, stand your cups upright and pour the white mixture gently over the red—the condensed milk makes it thicker and more forgiving, so it won't immediately sink and mix. Return them to the fridge for another 45 to 60 minutes until the white feels firm to the touch.
- Finish with the blue finale:
- Dissolve the blue raspberry Jello in boiling water the same way you did the red, watching that brilliant blue-purple emerge, then add cold water and let it cool completely to room temperature before adding it on top. Pour it slowly and carefully into each cup, and refrigerate upright for at least two hours—this is when you can finally relax because the layers aren't going anywhere now.
- Top and serve:
- Just before serving, crown each cup with a dollop of whipped cream and scatter fresh berries on top for color and a little tartness that breaks up the sweetness.
 Save
Save Watching my daughter carefully position the cups in that muffin tin, tongue poking out in concentration, made me realize that these jellies had somehow turned into something beyond dessert—they were a tiny lesson in layering life itself, in understanding that beautiful things take patience and care. Now whenever someone asks if we can rush the chilling time, we all know the answer together: no, not if we want perfection.
The Art of Angling and Patience
The muffin tin isn't just a holding device; it's a tool that teaches you something about the physics of gelatin and gravity. When you tilt those cups at an angle for the red layer, you're actually slowing down the setting process slightly, which sounds counterintuitive until you realize that a slower set creates clearer, sharper layers than a rushed one. I learned this the hard way when I tried to skip the tin and use a regular plate, and the red layer set unevenly, creating this wavy mess that looked more like modern art than patriotic dessert.
The White Layer Magic
That creamy white middle isn't just decoration—it's a flavor and texture buffer that transforms these jellies from simple Jello cups into something memorable. The unflavored gelatin combined with sweetened condensed milk creates a mousse-like texture that's light but indulgent, and it's forgiving enough that even if you're a little off with your timing, it still works beautifully. The white layer also visually separates the red and blue so they don't blend into purple, which was my original fear before I understood how firm gelatin actually sets.
Color, Flavor, and Endless Variations
Once you master the basic technique, you can play with any color combination your heart desires—lime green, orange, grape purple, or stick with the patriotic theme and make it twice. The beauty of using flavored Jello is that you get color and taste in one package, and the cold water addition is the key to controlling the final consistency without overcooking the gelatin. Some friends have swapped the white cream layer for a clear layer using unflavored gelatin with just a touch of vanilla extract, creating an entirely different look while keeping the same technique.
- Dairy-free doesn't mean flavorless—coconut milk mixed with a bit of sugar creates a white layer that's slightly different but equally delicious and creamy.
- Don't skip cooling the blue layer to room temperature because pouring warm liquid over the white will create a blurred border that ruins the clean stripes you worked hard to build.
- Fresh berries on top aren't just pretty; they add a tartness that balances the sweetness of the condensed milk and Jello, making each spoonful feel lighter.
 Save
Save These jellies became my go-to dessert for celebrations because they're reliable, impressive, and somehow manage to bring joy to everyone at the table. They're proof that patience and a little kitchen ingenuity can turn something simple into something unforgettable.
Recipe FAQs
- → How do I ensure sharp layers in the cups?
Allow each layer to fully set in the refrigerator before pouring the next, chilling at a slight angle for proper separation.
- → Can I substitute the sweetened condensed milk?
Yes, for a dairy-free option use coconut milk combined with sugar to achieve a similar creamy texture.
- → What is the best way to layer the gelatin?
Pour each cooled layer gently over the set previous layer and chill upright until firm to maintain distinct borders.
- → How long does the dessert need to chill before serving?
The total chilling time is about 4 hours and 30 minutes, with each layer requiring about 45 to 60 minutes to set initially.
- → What tools help achieve the angled layering effect?
Using a muffin tin to hold the cups at a slight angle during the setting of the first layer creates the striped visual.